I've had need on a couple of occasions of a way to transfer files around. Having never really come up with a good online file hosting solution, I decided to have a punt at setting something up on my PC which could do the basics.
FTP wasn't a preferred solution, since it's not the most secure of protocols. FTPS (i.e. FTP with SSL) is a good step up in security, but doesn't seem particularly well supported by client programs or server apps (do I correctly remember something about needing certificates to do it properly? This all happened a while ago).
Anyway, I settled on trying to set up an SFTP server. SFTP is a protocol that's closely related to SSH, and reasonably well-supported.
To find out more about file transfer protocols, why not start at the FTP page on Wikipedia?
(Incidentally, there are of course plenty of other ways to solve this problem, but this solution's pretty straightforward.)
Tools
Thankfully, a very lightweight server app for Windows turned up before too long spent with Google - Core FTP's Free SFTP server, which can be downloaded from here.
If you're after more features - including support for FTP / FTPS etc, then Cerberus FTP did a good job when I tried it out. I didn't stick with it because it just seemed a bit excessive for my simple requirements.
Having tried a couple of different ways to manipulate files onto and out of my computer from remote locations, I recommend either:
1. FireFTP - an extension for Firefox which can understand all this (it has PuTTY integrated into it)
2. WinSCP - a standard executable for Windows, which optionally comes as a standalone download.
A note to ST585 users
It turns out that the Thomson ST585 (a wireless router) auto rewrites the PASV replies that an FTP server generates, so any server software should be told not to do it - all you've got to do is open and forward port 21, and it should work.
25 November 2008
09 November 2008
Samsung Q45 Memory Upgrade
Okay, so I'm gonna start with an easy one. Unfortunately, this information is largely out of date now, since I bought my Q45 over a year ago. I'm going to concentrate here on the disassembly of the laptop, since actually fitting DIMMs is pretty straightforward.
Anyhow - after getting my new laptop, it was obvious pretty quickly that I'd want to upgrade the RAM 'cos Vista's quite keen on caching all kinds of things. I got a pair of 1GB DDR2 SODIMMs from Crucial, and set about replacing the memory that was already installed.
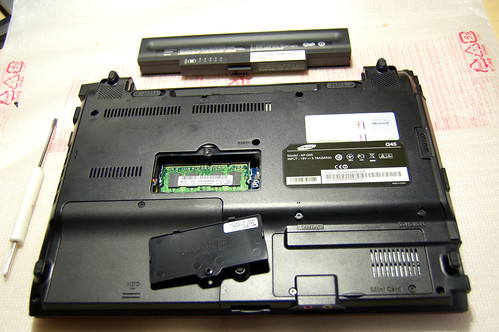
One module is in a very convenient location - underneath an access panel on the base of the laptop: (Battery removed to make sure I had no chance of turning it on by mistake!)
The other one, however, is underneath the keyboard! The keyboard itself is held in place with a variety of fasteners -
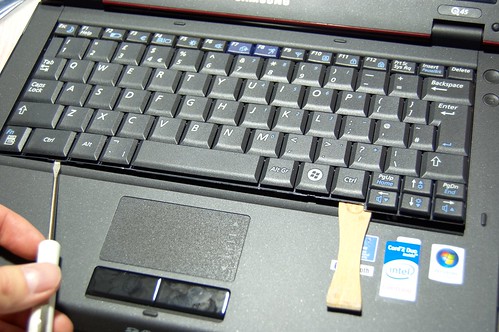
I found that the front right was relatively easy to lift, but the left hand side was more difficult. If you're trying this yourself, then please take your time! It's inevitable to cause the keyboard to flex a bit, but if you rush it and crack something, it's not my fault! Also, beware of the thin ribbon cable that connects the keyboard to the laptop - there's not much slack.
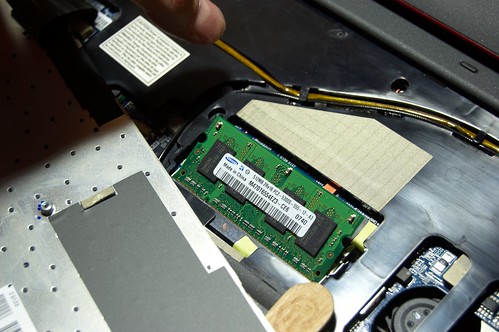
Anyway, with the keyboard up, it's a simple matter to remove the SODIMM and put in the new one.
As they say in that oh-so-understated way in a Haynes manual, reassembly is the reverse of removal !
Anyhow - after getting my new laptop, it was obvious pretty quickly that I'd want to upgrade the RAM 'cos Vista's quite keen on caching all kinds of things. I got a pair of 1GB DDR2 SODIMMs from Crucial, and set about replacing the memory that was already installed.
One module is in a very convenient location - underneath an access panel on the base of the laptop: (Battery removed to make sure I had no chance of turning it on by mistake!)
The other one, however, is underneath the keyboard! The keyboard itself is held in place with a variety of fasteners -
- Two spring-loaded catches: one below the start button, and the other below the Ctrl key
- Some moulded plastic nubs: two on the left hand side of the 'board, and one on the right
- Four screws, whose heads are accessed from the underside anywhere it's marked "KBD"
I found that the front right was relatively easy to lift, but the left hand side was more difficult. If you're trying this yourself, then please take your time! It's inevitable to cause the keyboard to flex a bit, but if you rush it and crack something, it's not my fault! Also, beware of the thin ribbon cable that connects the keyboard to the laptop - there's not much slack.
Anyway, with the keyboard up, it's a simple matter to remove the SODIMM and put in the new one.
As they say in that oh-so-understated way in a Haynes manual, reassembly is the reverse of removal !
08 November 2008
Much fiddling later...
Okay, so, it's gonna have to be fixed-width for now. Perhaps a job for another day can be making it all scale nicely :)
Shan't get round to adding anything interesting today; perhaps tomorrow.
Flickr image code found here, thanks!:
http://hellodigger.blogspot.com/2007/07/flickr-widget-for-blogger.html
One day, maybe I can have a project to get it to randomly pick images.
Shan't get round to adding anything interesting today; perhaps tomorrow.
Flickr image code found here, thanks!:
http://hellodigger.blogspot.com/2007/07/flickr-widget-for-blogger.html
One day, maybe I can have a project to get it to randomly pick images.
First Post!
Right, let's see what this can do. Once I've got a layout that looks reasonable (and includes the all-important flickr-y bit), I might actually get round to putting something useful up!
Subscribe to:
Posts (Atom)